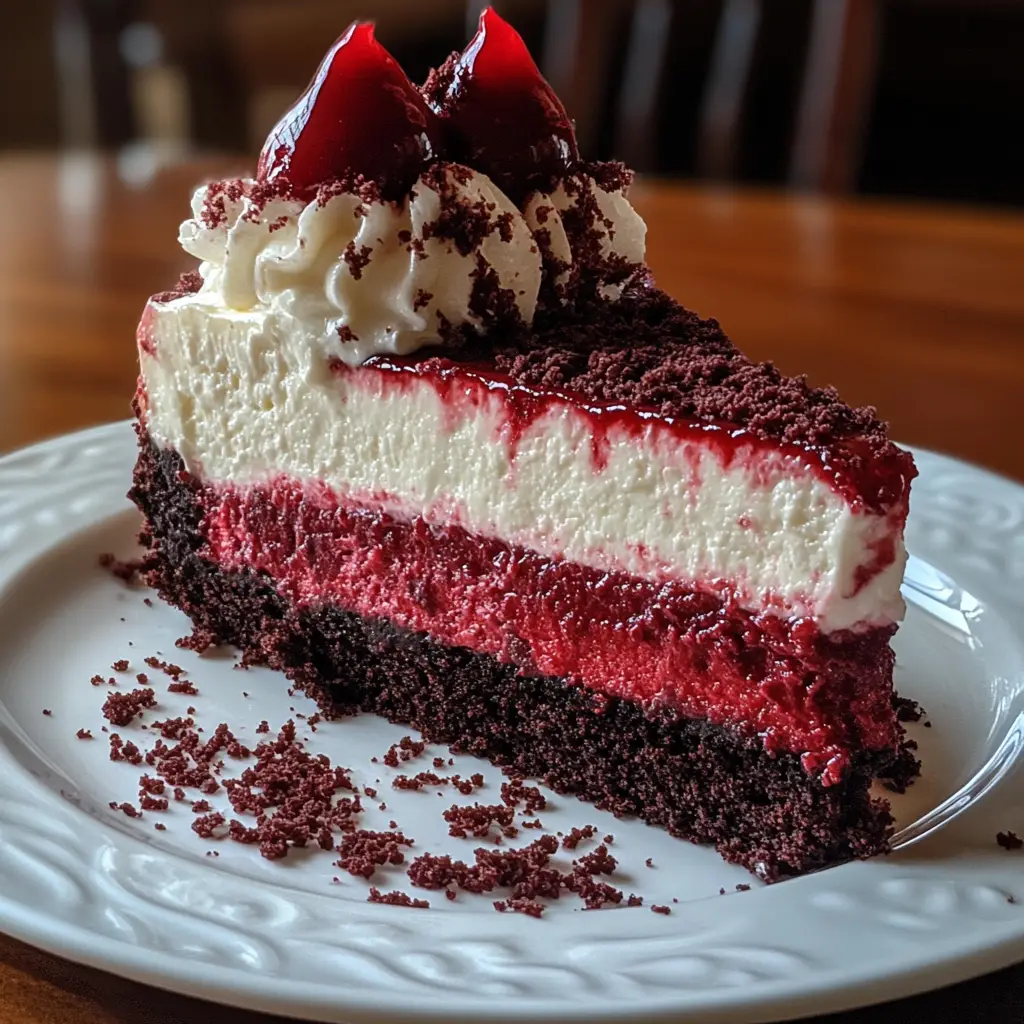
Introduction to Vampire Bite Red Velvet Cheesecake
As a passionate home cook, I know how hectic life can get, especially for busy moms and professionals. That’s why I’m excited to share my Vampire Bite Red Velvet Cheesecake recipe with you! This decadent dessert is not just a feast for the eyes; it’s a delightful treat that will impress your loved ones without taking hours in the kitchen. Perfect for Halloween or any special occasion, this cheesecake combines the rich flavors of red velvet with a creamy filling that’s simply irresistible. Trust me, this is one recipe you’ll want to keep on hand!
Why You’ll Love This Vampire Bite Red Velvet Cheesecake
This Vampire Bite Red Velvet Cheesecake is a game-changer for busy days. It’s quick to whip up, taking just 20 minutes of prep time. The taste? Oh, it’s a heavenly blend of rich cream cheese and moist red velvet that will have everyone asking for seconds. Plus, it’s a showstopper that adds a festive touch to any gathering, making it the perfect dessert for both Halloween and beyond!
Ingredients for Vampire Bite Red Velvet Cheesecake
Gathering the right ingredients is the first step to creating your Vampire Bite Red Velvet Cheesecake. Here’s what you’ll need:
- Red velvet cake mix: This is the star of the show, providing that signature color and flavor. You can use a box mix for convenience or make your own from scratch if you’re feeling adventurous.
- Unsalted butter: Melted butter adds richness to the crust. Using unsalted allows you to control the saltiness of your dessert.
- Egg: Just one large egg helps bind the crust together, giving it a nice texture.
- Cream cheese: The creamy filling is made with softened cream cheese, which gives the cheesecake its luscious texture. Full-fat cream cheese is recommended for the best flavor.
- Granulated sugar: This sweetens the cream cheese filling, balancing the tanginess of the cream cheese.
- Vanilla extract: A splash of vanilla enhances the overall flavor, making it even more delightful.
- Eggs: You’ll need two large eggs for the filling, which help it set perfectly.
- Sour cream: This adds a tangy richness to the filling, making it extra creamy.
- Heavy cream: For a luxurious texture, heavy cream is a must. It makes the filling smooth and decadent.
- Red food coloring (optional): If you want to amp up the red hue, a few drops of food coloring can do the trick. It’s not necessary, but it adds a fun visual element!
- Chocolate syrup: Drizzling this on top before serving adds a spooky touch and enhances the flavor.
For exact measurements, check the bottom of the article where you can find everything listed for easy printing. Happy baking!
How to Make Vampire Bite Red Velvet Cheesecake
Now that you have all your ingredients ready, let’s dive into the fun part—making your Vampire Bite Red Velvet Cheesecake! Follow these simple steps, and you’ll have a show-stopping dessert that’s sure to impress.
Step 1: Preheat the Oven
First things first, preheat your oven to 325°F (160°C). Preheating is crucial because it ensures that your cheesecake bakes evenly. A hot oven helps set the crust and filling perfectly, giving you that creamy texture we all love.
Step 2: Prepare the Crust
In a mixing bowl, combine the red velvet cake mix, melted butter, and one large egg. Mix until everything is well blended. The mixture should be thick and slightly sticky. Now, press this mixture firmly into the bottom of a greased springform pan. This will be the base of your cheesecake, so make sure it’s even and compact!
Step 3: Make the Cream Cheese Filling
In another bowl, beat the softened cream cheese, granulated sugar, and vanilla extract until smooth and creamy. This is where the magic happens! Next, add the two large eggs one at a time, mixing well after each addition. This helps incorporate air, making your filling light and fluffy.
Step 4: Combine and Color
Now, stir in the sour cream and heavy cream until fully combined. This adds that rich, velvety texture we crave. If you want to enhance the red color, add a few drops of red food coloring and mix until you achieve your desired hue. It’s all about that visual appeal!
Step 5: Bake the Cheesecake
Pour the cream cheese mixture over the crust in the springform pan. Bake for 50-60 minutes, or until the center is set but still slightly jiggly. To check for doneness, gently shake the pan. If the edges are firm and the center has a slight wobble, it’s ready!
Step 6: Cool and Refrigerate
Once baked, let your cheesecake cool in the pan for about an hour. This step is essential to prevent cracks. After it cools, refrigerate it for at least 4 hours, or overnight if you can wait! Chilling allows the flavors to meld beautifully.
Step 7: Serve with Style
When you’re ready to serve, drizzle chocolate syrup over the top for that spooky effect. It not only looks fantastic but adds a delicious touch to each slice. Your Vampire Bite Red Velvet Cheesecake is now ready to be devoured!
Tips for Success
- Use room temperature ingredients for a smoother batter.
- Don’t overmix the filling; this keeps it light and fluffy.
- Check for doneness by gently shaking the pan; a slight jiggle in the center is perfect.
- Let the cheesecake cool completely before refrigerating to avoid cracks.
- For a festive touch, add Halloween-themed decorations on top!
Equipment Needed
- Springform pan: Essential for easy removal. A regular cake pan works too, but it may be trickier to serve.
- Mixing bowls: Use a large bowl for the crust and a separate one for the filling.
- Electric mixer: A hand mixer or stand mixer makes beating the cream cheese a breeze.
- Spatula: Perfect for scraping down the sides of the bowl and smoothing the filling.
- Measuring cups and spoons: Accurate measurements are key to success!
Variations
- Gluten-Free: Substitute the red velvet cake mix with a gluten-free blend to make this cheesecake suitable for gluten-sensitive friends.
- Chocolate Lovers: Add chocolate chips to the cream cheese filling for an extra layer of indulgence.
- Fruit Topping: Top with fresh raspberries or strawberries for a fruity twist that complements the rich flavors.
- Lower Sugar: Use a sugar substitute in the filling to reduce the sweetness without sacrificing flavor.
- Vegan Option: Replace cream cheese with a vegan alternative and use flax eggs instead of regular eggs for a plant-based version.
Serving Suggestions
- Pair with Coffee: A warm cup of coffee or espresso complements the rich flavors beautifully.
- Ice Cream Delight: Serve with a scoop of vanilla or chocolate ice cream for extra indulgence.
- Festive Presentation: Garnish with Halloween-themed sprinkles or edible glitter for a spooky touch.
- Fresh Berries: Add a side of fresh raspberries or strawberries for a refreshing contrast.
- Whipped Cream: A dollop of whipped cream on top adds a light, airy finish.
FAQs about Vampire Bite Red Velvet Cheesecake
Can I make Vampire Bite Red Velvet Cheesecake ahead of time?
Absolutely! This cheesecake actually tastes better after chilling overnight. Just make sure to cover it well in the fridge to keep it fresh.
What can I use instead of cream cheese?
If you’re looking for a dairy-free option, try using a vegan cream cheese alternative. It works surprisingly well and still gives you that creamy texture!
How do I store leftovers?
Store any leftover cheesecake in an airtight container in the fridge. It should stay fresh for up to five days, but I doubt it will last that long!
Can I freeze this cheesecake?
Yes, you can freeze Vampire Bite Red Velvet Cheesecake! Just wrap it tightly in plastic wrap and then in aluminum foil. It can be frozen for up to three months. Thaw it in the fridge before serving.
What’s the best way to cut the cheesecake?
To get clean slices, use a sharp knife dipped in hot water. Wipe the knife clean between cuts for that perfect presentation!
Final Thoughts
Creating this Vampire Bite Red Velvet Cheesecake is more than just baking; it’s about making memories. The joy of watching your loved ones’ faces light up as they take that first bite is priceless. This dessert brings a festive spirit to any occasion, especially Halloween, while being simple enough for a busy day. Plus, the rich flavors and creamy texture make it a true crowd-pleaser. So, roll up your sleeves, gather your ingredients, and let this cheesecake be the star of your next gathering. Trust me, it’s a treat you won’t want to miss!