Introduction to Haunted House Gingerbread Cookies
As the leaves turn and the air gets crisp, I can’t help but feel the excitement of Halloween creeping in. There’s something magical about baking Haunted House Gingerbread Cookies that brings back childhood memories. These delightful treats are not just fun to make; they’re a quick solution for busy moms like us who want to create something special without spending hours in the kitchen. Plus, they’re perfect for impressing your loved ones at Halloween gatherings. So, let’s roll up our sleeves and dive into this spooky baking adventure together!
Why You’ll Love This Haunted House Gingerbread Cookies
These Haunted House Gingerbread Cookies are a delightful blend of ease and flavor. They come together quickly, making them perfect for busy days when you want to whip up something special. The warm spices fill your kitchen with a cozy aroma, and the decorating possibilities are endless! Whether you’re baking with kids or surprising friends, these cookies are sure to bring smiles and a touch of Halloween magic to your home.
Ingredients for Haunted House Gingerbread Cookies
Gathering the right ingredients is the first step to creating your Haunted House Gingerbread Cookies. Here’s what you’ll need:
- All-purpose flour: This is the foundation of your cookies, providing structure and stability.
- Ground ginger: Adds a warm, spicy kick that’s essential for that classic gingerbread flavor.
- Ground cinnamon: This spice brings a sweet warmth, making your cookies smell heavenly as they bake.
- Baking soda: A leavening agent that helps your cookies rise and become light and fluffy.
- Salt: Just a pinch enhances the flavors and balances the sweetness.
- Unsalted butter: Softened butter creates a rich, tender texture in your cookies.
- Brown sugar: This adds moisture and a deep, caramel-like sweetness that pairs perfectly with the spices.
- Molasses: A key ingredient that gives gingerbread its signature flavor and dark color.
- Large egg: Helps bind the ingredients together and adds richness.
- Vanilla extract: A splash of vanilla rounds out the flavors beautifully.
- Royal icing: This is your canvas for decorating, allowing you to create spooky designs.
- Assorted candies: Use these for fun decorations—think gummy worms, candy corn, or chocolate eyes!
For those looking to switch things up, consider adding more spices for a bolder flavor or using different types of sugar. You can find the exact measurements for each ingredient at the bottom of the article, ready for printing!
How to Make Haunted House Gingerbread Cookies
Now that we have our ingredients ready, let’s dive into the fun part—making our Haunted House Gingerbread Cookies! Follow these simple steps, and you’ll have a spooky treat that’s sure to impress.
Step 1: Preheat the Oven
First things first, preheat your oven to 350°F (175°C). Preheating is crucial because it ensures that your cookies bake evenly. If you skip this step, you might end up with cookies that are too soft or burnt on the edges. Trust me, a well-preheated oven is your best friend in baking!
Step 2: Prepare the Dry Ingredients
In a large bowl, whisk together the all-purpose flour, ground ginger, ground cinnamon, baking soda, and salt. This step is important because it evenly distributes the spices and leavening agent. A good mix will ensure that every bite of your Haunted House Gingerbread Cookies is packed with flavor!
Step 3: Cream the Butter and Sugar
In another bowl, cream together the softened unsalted butter and brown sugar until the mixture is light and fluffy. This process is essential for creating a tender texture in your cookies. The air you incorporate while creaming helps them rise beautifully in the oven. It’s like giving your cookies a little boost!
Step 4: Combine Wet Ingredients
Next, add the molasses, large egg, and vanilla extract to the butter and sugar mixture. Mix well until everything is combined. The molasses adds that rich, dark flavor we love in gingerbread, while the egg helps bind everything together. It’s a sticky, sweet delight!
Step 5: Mix Dry and Wet Ingredients
Gradually add the dry ingredients to the wet mixture, stirring until just combined. Be careful not to overmix; you want to keep your cookies tender. A few flour streaks are okay! This is where the magic happens, as the dough starts to come together into a beautiful, spiced mixture.
Step 6: Roll Out the Dough
Now it’s time to roll out the dough! On a floured surface, roll the dough to about 1/4 inch thick. This thickness is perfect for cookie shapes that hold their form while baking. If the dough is too thick, your cookies may not bake evenly, so keep an eye on that rolling pin!
Step 7: Cut Out Shapes
Using cookie cutters, cut out shapes for your haunted house and any spooky decorations you want. Think ghosts, bats, and pumpkins! The more creative, the better. This is where you can let your imagination run wild and create a cookie scene that’s uniquely yours.
Step 8: Bake the Cookies
Place the cookies on a baking sheet lined with parchment paper and bake for 8-10 minutes. Keep an eye on them; they’re done when the edges are firm but the centers are still soft. You want that perfect balance of chewy and crisp. Your kitchen will smell like a cozy autumn day!
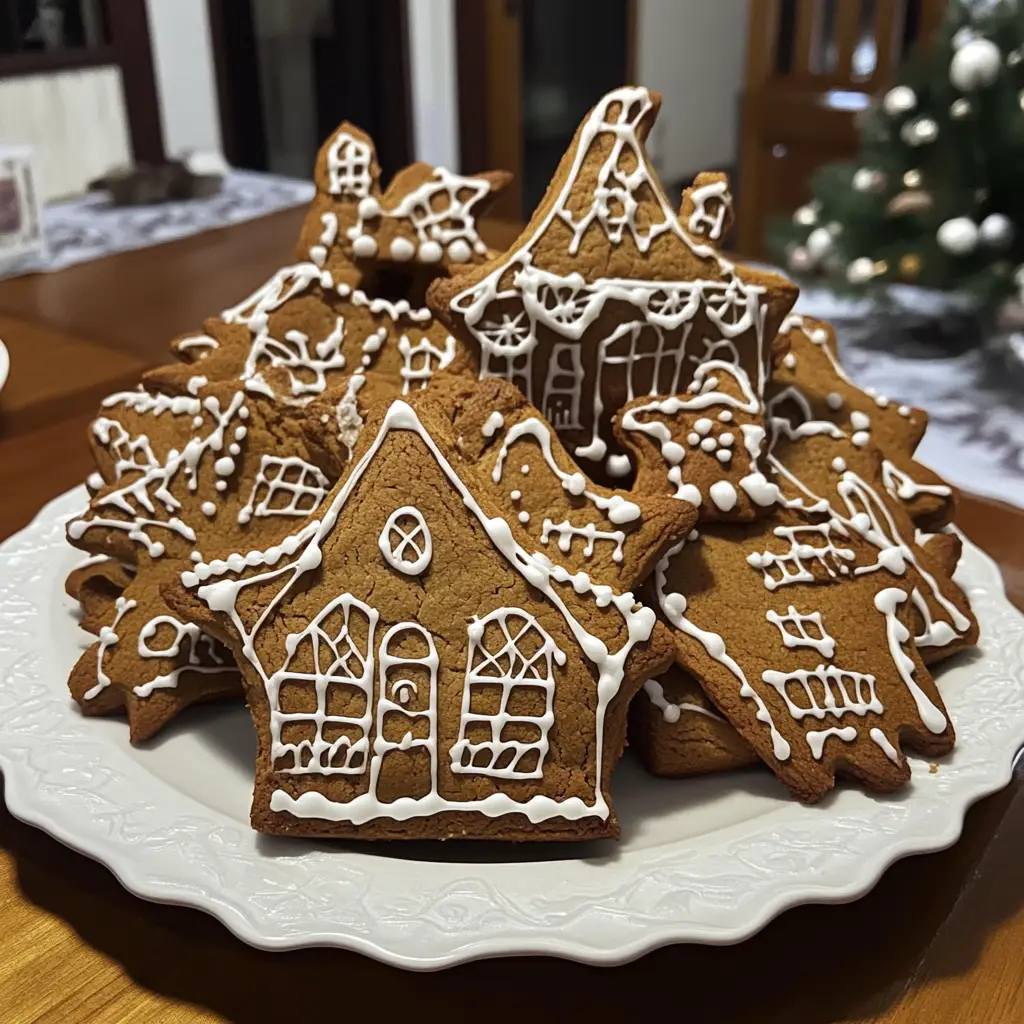
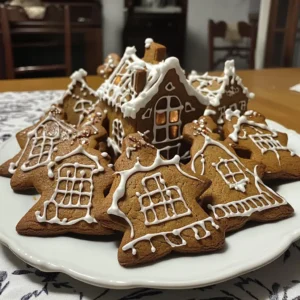
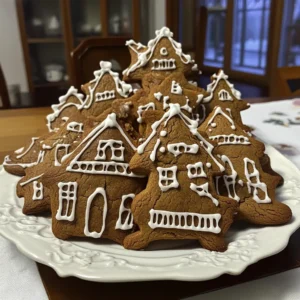
Step 9: Cool and Decorate
Once baked, let the cookies cool completely on a wire rack. This step is crucial! If you decorate them while they’re warm, the icing will melt away, and you’ll lose all your spooky designs. Once cooled, unleash your creativity with royal icing and assorted candies. It’s time to make your haunted house come to life!
Tips for Success
- Measure your ingredients accurately for the best results.
- Chill the dough for 30 minutes if it’s too sticky to roll out.
- Use a sharp knife to cut out shapes for clean edges.
- Experiment with different candies for unique decorations.
- Store cookies in an airtight container to keep them fresh longer.
Equipment Needed
- Baking sheet: A standard one works, but a silicone mat can prevent sticking.
- Parchment paper: Great for lining your baking sheet; aluminum foil is a good alternative.
- Mixing bowls: Use any size, but a large one is best for mixing dough.
- Rolling pin: A simple one will do; a wine bottle can work in a pinch!
- Cookie cutters: Get creative with shapes; a knife can also cut out shapes if needed.
Variations of Haunted House Gingerbread Cookies
- Gluten-Free Option: Substitute all-purpose flour with a gluten-free blend to make these cookies suitable for gluten-sensitive friends.
- Vegan Version: Replace the egg with a flaxseed egg (1 tablespoon ground flaxseed mixed with 2.5 tablespoons water) and use vegan butter for a plant-based treat.
- Spicy Twist: Add a pinch of cayenne pepper or black pepper for an unexpected kick that pairs well with the sweetness.
- Chocolate Gingerbread: Mix in cocoa powder (about 1/4 cup) for a rich chocolate flavor that complements the spices beautifully.
- Decorative Themes: Use different colored icing and themed candies to create a winter wonderland or a spooky graveyard scene!
Serving Suggestions for Haunted House Gingerbread Cookies
- Pair these cookies with a warm cup of spiced apple cider for a cozy treat.
- Serve alongside a scoop of vanilla ice cream for a delightful dessert experience.
- Display your decorated cookies on a spooky-themed platter for a festive touch.
- Include them in a Halloween goodie bag for friends and family.
- Use them as fun place settings at your Halloween party!
FAQs about Haunted House Gingerbread Cookies
Can I make the dough ahead of time?
Absolutely! You can prepare the dough a day in advance. Just wrap it tightly in plastic wrap and refrigerate. When you’re ready to bake, let it sit at room temperature for a few minutes before rolling it out.
How do I store my Haunted House Gingerbread Cookies?
To keep your cookies fresh, store them in an airtight container at room temperature. They’ll stay delicious for up to a week. If you want to keep them longer, consider freezing them!
Can I use different spices in the recipe?
Yes! Feel free to experiment with spices like nutmeg or allspice for a unique flavor twist. Just remember, the classic ginger and cinnamon combo is what gives these cookies their signature taste!
What can I use instead of royal icing for decorating?
If royal icing isn’t your thing, you can use store-bought frosting or melted chocolate. Both options work well for decorating and add a sweet touch to your spooky creations!
Are these cookies suitable for kids to decorate?
Definitely! Decorating Haunted House Gingerbread Cookies is a fun activity for kids. Just set out a variety of candies and let their creativity shine. It’s a great way to make lasting memories together!
Final Thoughts
Baking Haunted House Gingerbread Cookies is more than just a recipe; it’s an experience filled with laughter, creativity, and a sprinkle of Halloween magic. As you roll out the dough and decorate each cookie, you’re not just making treats; you’re creating memories with your loved ones. The joy of seeing their faces light up as they admire your spooky creations is priceless. So, gather your family, unleash your imagination, and let these cookies bring warmth and fun to your Halloween celebrations. Trust me, the smiles and deliciousness will be worth every moment spent in the kitchen!
Print
Haunted House Gingerbread Cookies: Bake Your Spookiest Treats!
- Prep Time: 30 minutes
- Cook Time: 10 minutes
- Total Time: 40 minutes
- Yield: 24 cookies 1x
- Category: Dessert
- Method: Baking
- Cuisine: American
- Diet: Vegetarian
Description
These Haunted House Gingerbread Cookies are a fun and spooky treat perfect for Halloween. They are easy to make and can be decorated in various creative ways.
Ingredients
- 3 cups all-purpose flour
- 1 tablespoon ground ginger
- 1 tablespoon ground cinnamon
- 1 teaspoon baking soda
- 1/2 teaspoon salt
- 1/2 cup unsalted butter, softened
- 1 cup brown sugar
- 1/2 cup molasses
- 1 large egg
- 1 teaspoon vanilla extract
- Royal icing for decoration
- Assorted candies for decoration
Instructions
- Preheat your oven to 350°F (175°C).
- In a bowl, whisk together flour, ginger, cinnamon, baking soda, and salt.
- In another bowl, cream together the butter and brown sugar until light and fluffy.
- Add molasses, egg, and vanilla extract to the butter mixture and mix well.
- Gradually add the dry ingredients to the wet ingredients, mixing until combined.
- Roll out the dough on a floured surface to about 1/4 inch thick.
- Cut out shapes for the haunted house and other decorations using cookie cutters.
- Place the cookies on a baking sheet lined with parchment paper and bake for 8-10 minutes.
- Let the cookies cool completely before decorating with royal icing and candies.
Notes
- For a spicier flavor, add more ginger or cinnamon.
- Make sure the cookies are completely cool before decorating to prevent the icing from melting.
- Store cookies in an airtight container to keep them fresh.
Nutrition
- Serving Size: 1 cookie
- Calories: 150
- Sugar: 10g
- Sodium: 50mg
- Fat: 5g
- Saturated Fat: 3g
- Unsaturated Fat: 2g
- Trans Fat: 0g
- Carbohydrates: 22g
- Fiber: 1g
- Protein: 2g
- Cholesterol: 15mg