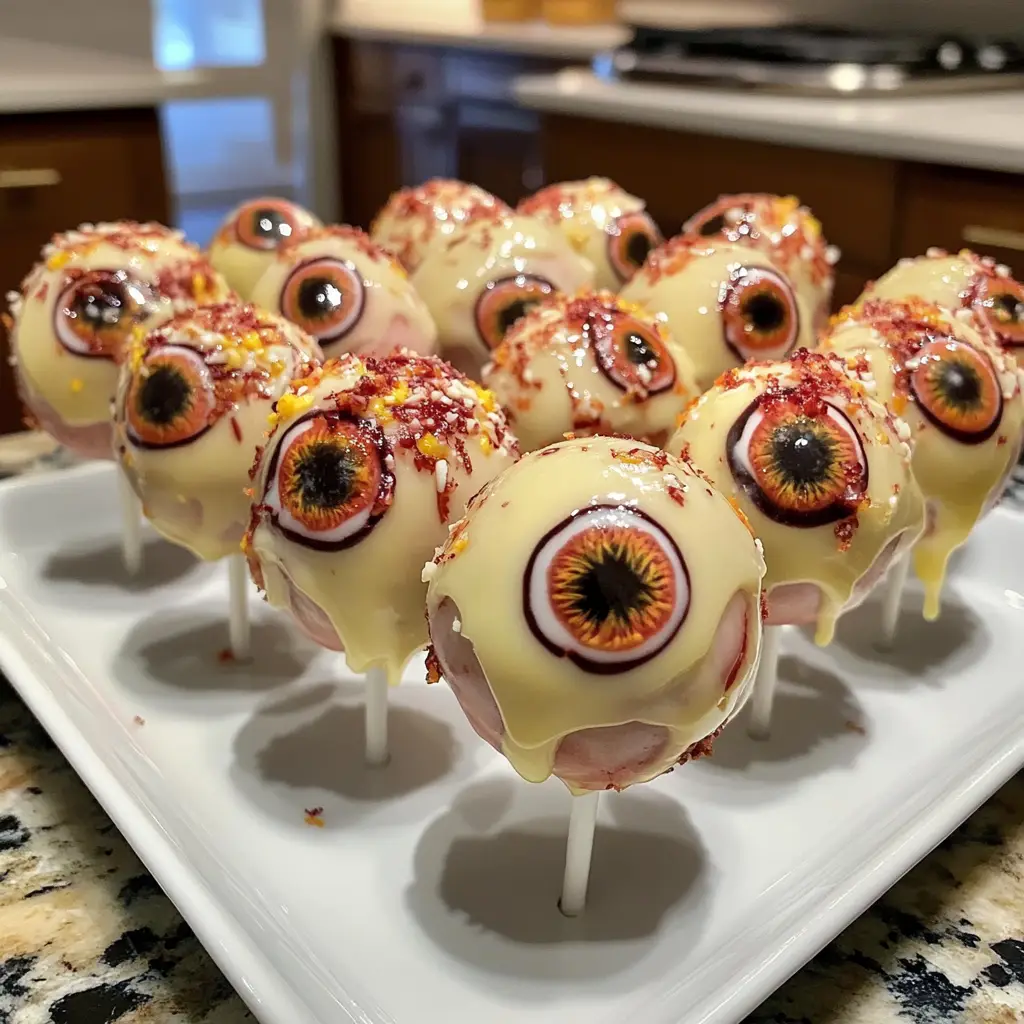
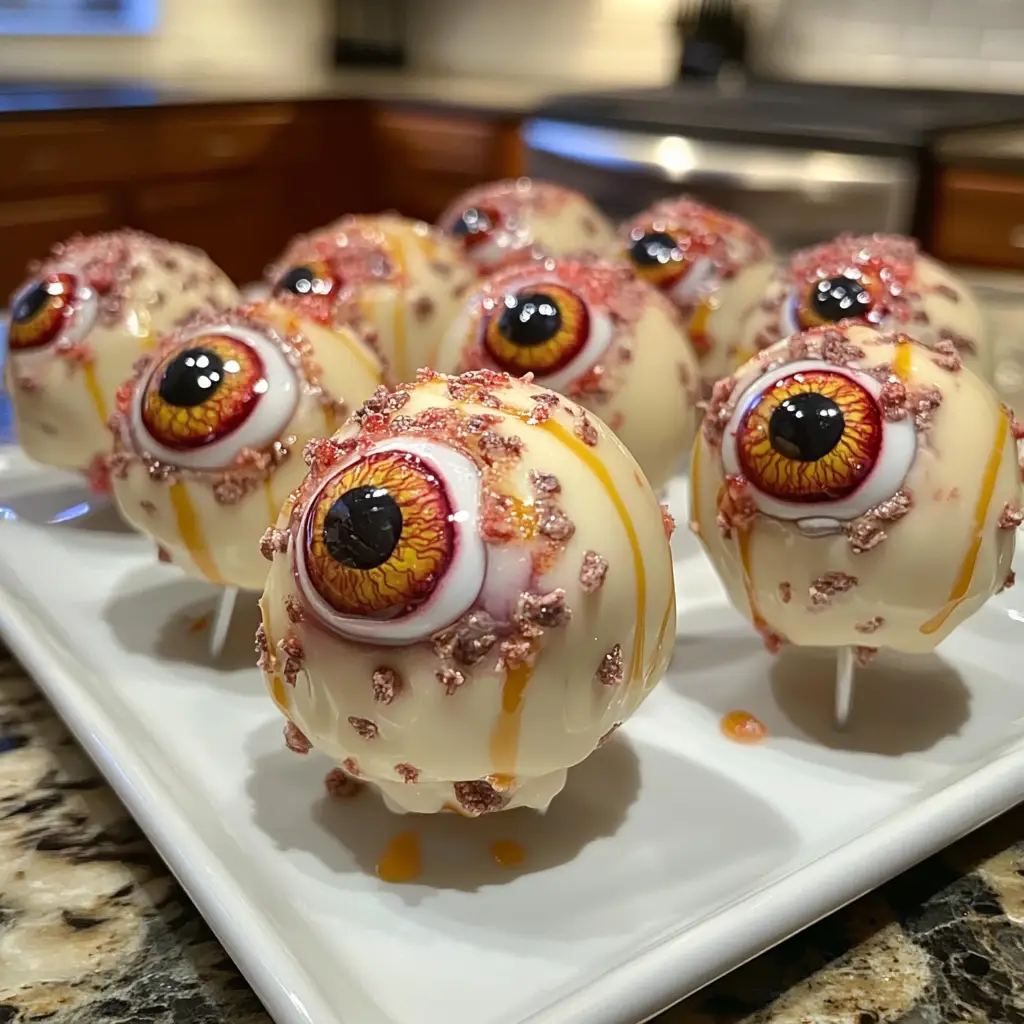
Introduction to Monster Eyeball Cake Pops
As a busy mom, I know how challenging it can be to whip up something fun and festive, especially around Halloween. That’s why I absolutely adore these Monster Eyeball Cake Pops! They’re not just a treat; they’re a delightful way to bring a little spooky magic into your kitchen. With their creepy yet cute appearance, these cake pops are sure to impress both kids and adults alike. Plus, they’re quick to make, making them a perfect solution for those hectic days when you want to create something special without spending hours in the kitchen.
Why You’ll Love This Monster Eyeball Cake Pops
These Monster Eyeball Cake Pops are a game-changer for busy families! They’re incredibly easy to make, allowing you to spend more time enjoying the festivities and less time in the kitchen. The delightful combination of flavors will have everyone coming back for more. Plus, they’re a fantastic way to get the kids involved in the kitchen, making memories while creating these spooky treats together!
Ingredients for Monster Eyeball Cake Pops
Gathering the right ingredients is half the fun of making these Monster Eyeball Cake Pops! Here’s what you’ll need:
- Cake mix: A box of your favorite flavor makes this recipe super easy. Chocolate or vanilla works great!
- Frosting: This binds the crumbled cake together. Choose a flavor that complements your cake mix for a delicious combo.
- Candy melts (white): These are the base for your eyeball coating. They melt smoothly and create a perfect canvas for decorating.
- Candy melts (green): Use these to create the eerie iris of your monster eyeballs. You can also experiment with other colors!
- Candy melts (red): Drizzle these around the eyeball for a creepy, bloodshot effect. It adds a fun touch to your spooky treats.
- Chocolate chips: These serve as the pupils of your eyeballs. They’re easy to place and add a nice chocolatey flavor.
- Lollipop sticks: Essential for turning your cake mixture into pops! They make it easy to hold and eat these delightful treats.
For those who want to get creative, you can swap out the cake mix for a gluten-free version or use homemade frosting if you have the time. The exact quantities for each ingredient are listed at the bottom of the article, making it easy for you to print and follow along!
How to Make Monster Eyeball Cake Pops
Now that you have your ingredients ready, let’s dive into the fun part—making these Monster Eyeball Cake Pops! Follow these simple steps, and you’ll have a spooky treat that’s sure to impress.
Step 1: Prepare the Cake Mix
Start by preparing the cake mix according to the package instructions. This usually involves mixing the cake mix with water, eggs, and oil. The aroma of baking cake is simply delightful! Once it’s ready, pour it into a greased cake pan and pop it in the oven.
Step 2: Crumble and Mix
After the cake has cooled completely, it’s time to crumble it into a large bowl. I like to use my hands for this part; it’s a bit messy but so much fun! Mix in the frosting until everything is well combined. The mixture should be moist but not too sticky.
Step 3: Form the Cake Balls
Now, take small portions of the mixture and roll them into balls. Aim for about one inch in diameter. Place these cake balls on a baking sheet lined with parchment paper. This is where the magic begins, as they start to resemble little monster eyeballs!
Step 4: Freeze the Cake Pops
Insert lollipop sticks into each cake ball, making sure they’re secure. Then, pop the baking sheet into the freezer for about 30 minutes. This step is crucial! Freezing helps the cake pops hold their shape when you dip them in candy melts.
Step 5: Melt the White Candy Melts
While the cake pops are freezing, melt the white candy melts in a microwave-safe bowl. Heat them in short bursts, stirring in between, until they’re smooth and creamy. This will be the base for your eyeballs, so make sure it’s nice and melted!
Step 6: Dip the Cake Pops
Once the cake pops are firm, it’s time to dip! Hold each pop by the stick and dip it into the melted white candy melts. Make sure it’s fully coated. Allow any excess candy to drip off before placing them back on the parchment paper to set.
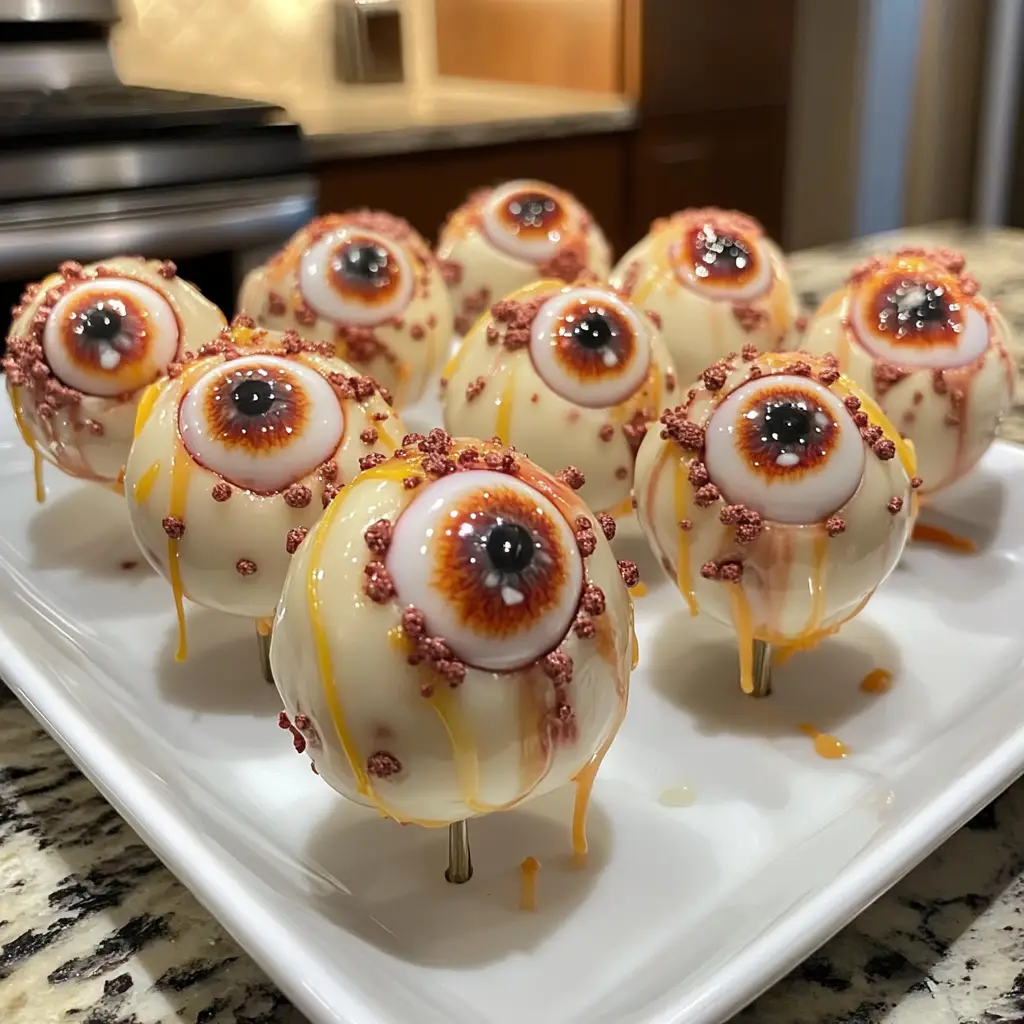
Step 7: Decorate with Green Candy Melts
After the white coating has set, melt the green candy melts. Use a piping bag or a small spoon to create a circle in the center of each cake pop. This will be the iris of your monster eyeball. Get creative with the designs!
Step 8: Add the Chocolate Chip Pupil
While the green candy melts are still soft, gently press a chocolate chip into the center of each green circle. This adds a fun touch and makes your eyeballs come to life! The combination of chocolate and candy melts is simply irresistible.
Step 9: Drizzle with Red Candy Melts
Finally, melt the red candy melts and drizzle them around the eyeball for that creepy, bloodshot effect. You can use a piping bag or a fork for this. It’s the finishing touch that makes these Monster Eyeball Cake Pops truly spooky!
Tips for Success
- Make sure your cake is completely cooled before crumbling; this prevents a soggy mixture.
- Use a cookie scoop for uniform cake balls; it makes the process quicker and easier.
- Don’t skip the freezing step; it helps the cake pops maintain their shape during dipping.
- Experiment with different colors of candy melts for a fun twist on the eyeballs.
- Have fun with the decorating; let your creativity shine!
Equipment Needed
- Cake pan: A standard 9×13 inch pan works well, but any baking dish will do.
- Baking sheet: Use a regular sheet or a cooling rack for setting the cake pops.
- Parchment paper: This keeps the pops from sticking; wax paper is a good alternative.
- Microwave-safe bowl: Any bowl that can handle heat will work for melting candy melts.
- Piping bag or spoon: For decorating, a zip-top bag with a corner cut can substitute.
Variations
- Gluten-Free: Use a gluten-free cake mix to make these Monster Eyeball Cake Pops suitable for those with dietary restrictions.
- Vegan Option: Substitute eggs with applesauce or flaxseed meal and use dairy-free frosting and candy melts for a vegan-friendly treat.
- Flavor Twists: Experiment with different cake flavors like red velvet or lemon for a unique spin on the classic eyeball.
- Colorful Eyeballs: Use blue or purple candy melts for a fun twist on the traditional green iris.
- Mini Pops: Make smaller cake balls for bite-sized treats that are perfect for parties or gatherings.
Serving Suggestions
- Pair these Monster Eyeball Cake Pops with spooky-themed drinks like a witch’s brew punch or apple cider.
- Serve them on a decorative platter with fake spider webs for a fun Halloween display.
- Include a variety of other Halloween treats for a festive dessert table.
- Wrap them in clear bags tied with colorful ribbons for party favors.
FAQs about Monster Eyeball Cake Pops
As you embark on your journey to create these delightful Monster Eyeball Cake Pops, you might have a few questions. Here are some common queries that can help you along the way!
Can I make Monster Eyeball Cake Pops ahead of time?
Absolutely! You can prepare the cake pops a day in advance. Just store them in the refrigerator to keep them fresh. They’ll be ready to impress your guests when you need them!
What can I use instead of candy melts?
If you can’t find candy melts, you can use chocolate chips or white chocolate. Just melt them down and follow the same dipping process. It’s a great alternative that still tastes delicious!
How do I store leftover cake pops?
Store any leftover Monster Eyeball Cake Pops in an airtight container in the refrigerator. They’ll stay fresh for up to a week, but I doubt they’ll last that long!
Can I customize the flavors of the cake pops?
Definitely! Feel free to experiment with different cake flavors and frosting combinations. Red velvet with cream cheese frosting is a spooky twist that many love!
Are these cake pops suitable for kids?
Yes! These Monster Eyeball Cake Pops are a hit with kids. They’re fun to make and even more fun to eat. Just keep an eye on the little ones with the lollipop sticks!
Final Thoughts
Creating these Monster Eyeball Cake Pops is more than just baking; it’s about making memories with your loved ones. The joy on your kids’ faces as they help decorate these spooky treats is priceless. Plus, the delicious flavors and fun presentation make them a hit at any gathering. Whether it’s a Halloween party or a simple family treat, these cake pops bring a touch of whimsy to the table. So roll up your sleeves, gather your ingredients, and let the monster-making magic begin! You’ll be amazed at how much fun you can have in the kitchen!
Print
Monster Eyeball Cake Pops: A Spooky Treat You Must Try!
- Prep Time: 30 minutes
- Cook Time: 30 minutes
- Total Time: 1 hour
- Yield: 24 cake pops 1x
- Category: Dessert
- Method: Baking and Dipping
- Cuisine: American
- Diet: Vegetarian
Description
Monster Eyeball Cake Pops are a fun and spooky treat perfect for Halloween or any monster-themed party. These cake pops are decorated to look like creepy eyeballs, making them a hit with kids and adults alike.
Ingredients
- 1 box of cake mix
- 1 cup of frosting
- 1 package of candy melts (white)
- 1 package of candy melts (green)
- 1 package of candy melts (red)
- 1 package of chocolate chips
- 1 package of lollipop sticks
Instructions
- Prepare the cake mix according to package instructions and bake in a cake pan.
- Once cooled, crumble the cake into a large bowl and mix in the frosting until well combined.
- Form the mixture into balls and place them on a baking sheet lined with parchment paper.
- Insert lollipop sticks into each ball and freeze for about 30 minutes.
- Melt the white candy melts in a microwave-safe bowl.
- Dip each cake pop into the melted white candy melts, ensuring they are fully coated.
- Allow excess candy to drip off and place the pops back on the parchment paper to set.
- Once set, use the green candy melts to create a circle in the center of each cake pop.
- Place a chocolate chip in the center of the green circle to create the pupil.
- Use the red candy melts to drizzle around the eyeball for a creepy effect.
Notes
- Make sure the cake pops are completely cooled before dipping in candy melts.
- You can use different colors for the eyeballs to create a variety of spooky effects.
- Store the cake pops in the refrigerator if not consumed immediately.
Nutrition
- Serving Size: 1 cake pop
- Calories: 150
- Sugar: 12g
- Sodium: 50mg
- Fat: 7g
- Saturated Fat: 4g
- Unsaturated Fat: 2g
- Trans Fat: 0g
- Carbohydrates: 20g
- Fiber: 0g
- Protein: 2g
- Cholesterol: 15mg